


 Cable Automotive / Marine




 Cable Lugs
 Cable Lug Assortment Kits
 Cable Lugs Straight Wall Closed
 Cable Glands
 Convoluted Split Tubing
 12/24v Products & Access




 Electrical Connectors





 Solar Powered Products



 LED Lights







 Tools










 Auto Parts & Categories



 Fittings








 Cleaning & Misc





 Clearance & Promotion
Latest News
12V Solar Wiring Guide for Reliable Setups
Jun
A flat battery at camp usually comes down to one of two things – not enough solar, or poor wiring. This 12V solar wiring guide is aimed at the second problem. If your panel, regulator, battery and loads are not matched properly, even decent gear can underperform. In mobile 12V systems, voltage drop, undersized cable and weak connections cause more trouble than most people expect.
Whether you are wiring a touring 4WD, caravan, canopy setup or small marine system, the goal is the same. You want charging that is safe, efficient and reliable in real Australian conditions. That means choosing the right cable, protecting circuits properly, and understanding where each component fits in the system.
What a basic 12V solar system needs
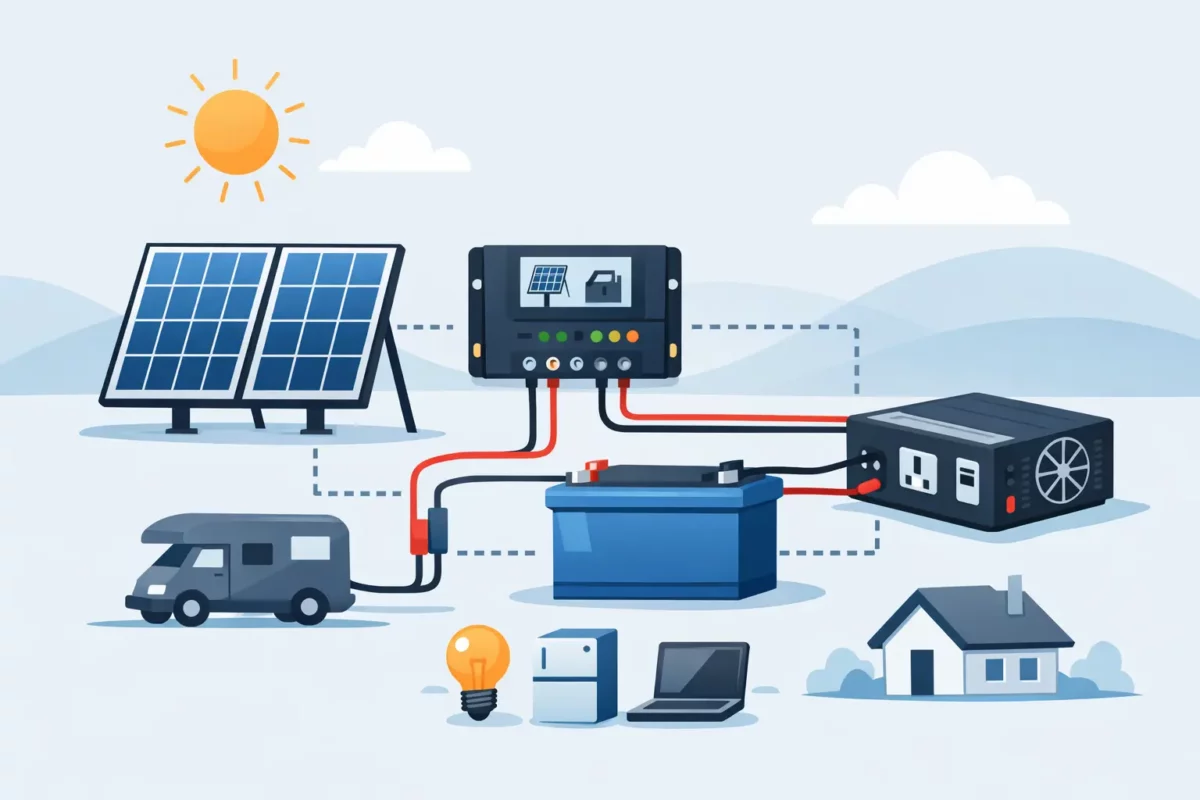
At its simplest, a 12V solar setup has four parts. You have the solar panel, a solar regulator, the battery, and the loads drawing power from the battery. In some systems the loads are lights, a fridge, pumps or USB outlets. In others, you may also have an inverter, a DC-DC charger, or extra battery monitoring.
The regulator sits between the panel and the battery. Its job is to control charging voltage and current so the battery charges correctly without being overworked. In a proper layout, the panel feeds the regulator, the regulator feeds the battery, and the loads are supplied from the battery through fused distribution.
That order matters. Running loads from the wrong point, or skipping protection because the run is short, often leads to faults that are hard to track later.
12V solar wiring guide: start with your current, not just your panel size
A lot of people choose cable by looking at panel wattage alone. That is only part of the picture. Wiring needs to be sized to current, cable length and acceptable voltage drop.
For example, a 200W panel on a 12V system can produce around 11 amps in ideal conditions. If the cable run from the panel to the regulator is long, or the run from the regulator to the battery is longer than it should be, too much voltage can be lost in the cable. That lost voltage is charging performance you do not get back.
As a rule, the regulator-to-battery cable deserves close attention because that section directly affects battery charging accuracy. Keep it as short as practical and use cable sized for low voltage drop. In small systems, people often focus on the visible panel lead and forget the short battery link is just as important.
If you are running portable panels to a caravan or vehicle, cable size becomes even more critical. Long extension leads with light cable can severely limit charging, especially in the early and late parts of the day when solar input is already lower.
Panel wiring: series or parallel depends on your system
If you have more than one panel, the next question is whether to wire them in series or parallel. There is no universal answer. It depends on your regulator, panel specs, cable length and how the system is used.
Parallel wiring keeps panel voltage similar to a single panel while increasing current. It is common in 12V applications and can be a practical option where partial shading is likely. If one panel is affected, the whole array may be less compromised than with some series arrangements.
Series wiring increases voltage while current stays the same. This can reduce cable losses over longer runs, which is useful in some caravan and fixed-mount installations. But your regulator must be rated for the higher input voltage, and shading on one panel can have a bigger effect on output.
For many mobile setups, especially where simplicity and compatibility matter, parallel is the more familiar choice. For longer cable runs and MPPT regulator systems, series can make sense. The right answer depends on how the system is built, not what worked on someone else’s ute.
PWM vs MPPT regulators
A regulator is not just a box that sits between the panel and battery. It has a direct impact on charging performance.
PWM regulators are generally simpler and cheaper. In smaller setups with matched panel and battery voltage, they can do the job well enough. They are often seen in entry-level or portable systems where budget matters and cable runs are short.
MPPT regulators are usually the better choice when you want stronger charging efficiency, especially with higher-voltage panels or in mixed sunlight conditions. They convert excess panel voltage into usable charging current more effectively than PWM units. In practical terms, that can mean better output through winter, during overcast periods, or when panel voltage is well above battery voltage.
For serious touring, caravan systems and trade setups where reliability matters, MPPT is often worth the extra cost. The gain is not magic, but in real conditions it is often noticeable.
Fusing and circuit protection are not optional
One of the most common mistakes in a 12V solar install is assuming solar is low-risk because the voltage is low. The real issue is current. A battery can supply enough current to damage cable, connectors and equipment very quickly if a fault occurs.
Fuse the cable as close as practical to the battery positive terminal. If your solar regulator has a dedicated battery feed, protect that circuit properly. If your panel side requires protection based on array configuration or manufacturer guidance, fit the correct fuse or breaker there too.
A fuse protects the cable, not just the appliance. That means fuse size should match the cable capacity and the expected load, not simply the highest fuse you happen to have in the drawer.
Circuit breakers can be useful for isolation and serviceability, but they still need to be selected correctly. Poor-quality protection gear creates its own problems, particularly in rough service environments.
Connectors, joins and terminations matter more than most people think
A solar setup is only as good as its weakest connection. Heat at a terminal, corrosion in a plug, or a badly crimped lug can cause voltage loss, intermittent charging and eventual failure.
Use connectors that suit the environment and current draw. For removable panels, weather-resistant solar connectors are standard on the panel side, while Anderson-style connectors are widely used in vehicle and caravan applications for quick, reliable DC connection. They are especially practical where portability, vibration resistance and serviceability matter.
Crimping needs to be done with the right tool for the terminal type and cable size. A poor crimp may look acceptable at first but fail once exposed to corrugations, engine bay heat or repeated movement. In trade and touring applications alike, proper terminations save time and faults later.
Battery type changes the charging setup
Not all batteries want the same charging profile. AGM, gel, flooded lead acid and lithium all have different voltage requirements and charging behaviour. Your regulator needs to support the battery chemistry you are using, and the charge settings need to be correct.
Lithium batteries in particular need more attention. Many work very well in 12V solar systems, but only when the regulator settings, battery management system and cable protection all line up properly. Assuming a regulator’s default mode is good enough can be an expensive mistake.
Battery location also affects wiring choices. A battery mounted in a caravan tunnel boot, canopy or marine compartment may need different cable routing, protection and ventilation considerations than one mounted inside a vehicle cabin.
Common mistakes this 12V solar wiring guide should help you avoid
Most underperforming systems fail in predictable ways. The first is undersized cable, especially on portable panel leads and regulator-to-battery runs. The second is poor earthing or relying on unsuitable return paths. In a dedicated 12V setup, running an appropriate negative return cable is usually the better approach than hoping a chassis return will behave perfectly in every condition.
The third is mixing connector types and adaptors without thinking about current rating or weather exposure. The fourth is mounting the regulator too far from the battery. The fifth is buying components individually without checking that panel voltage, regulator input range, battery chemistry and fuse ratings all work together.
This is where a specialist supplier matters. Bluebar Industries supports both DIY users and trade customers with fit-for-purpose cable, connectors, adaptors and installation gear that suit actual 12V and 24V work, not generic shelf stock.
A practical approach to wiring layout
Keep the panel-to-regulator run appropriate for the panel current and distance. Mount the regulator close to the battery where possible. Use suitably sized twin cable or clearly managed positive and negative runs. Protect the battery connection with the correct fuse. Use quality lugs, connectors and cable protection anywhere the wiring may rub, vibrate or see dust and moisture.
If the setup is portable, think about repeated handling. If it is vehicle-mounted, think about vibration and heat. If it is in a caravan or marine environment, think about corrosion and cable support. Good wiring is not just electrically correct. It is physically durable.
A 12V solar setup does not need to be overly complex, but it does need to be deliberate. The right cable size, sound protection and proper terminations will usually make more difference than chasing another small gain in panel wattage. Build it once, wire it properly, and the system is far more likely to do its job when you are relying on it.











