


 Cable Automotive / Marine




 Cable Lugs
 Cable Lug Assortment Kits
 Cable Lugs Straight Wall Closed
 Cable Glands
 Convoluted Split Tubing
 12/24v Products & Access




 Electrical Connectors





 Solar Powered Products



 LED Lights







 Tools










 Auto Parts & Categories



 Fittings








 Cleaning & Misc





 Clearance & Promotion
Latest News
Caravan Solar Wiring Layout Example for 12V
Sep
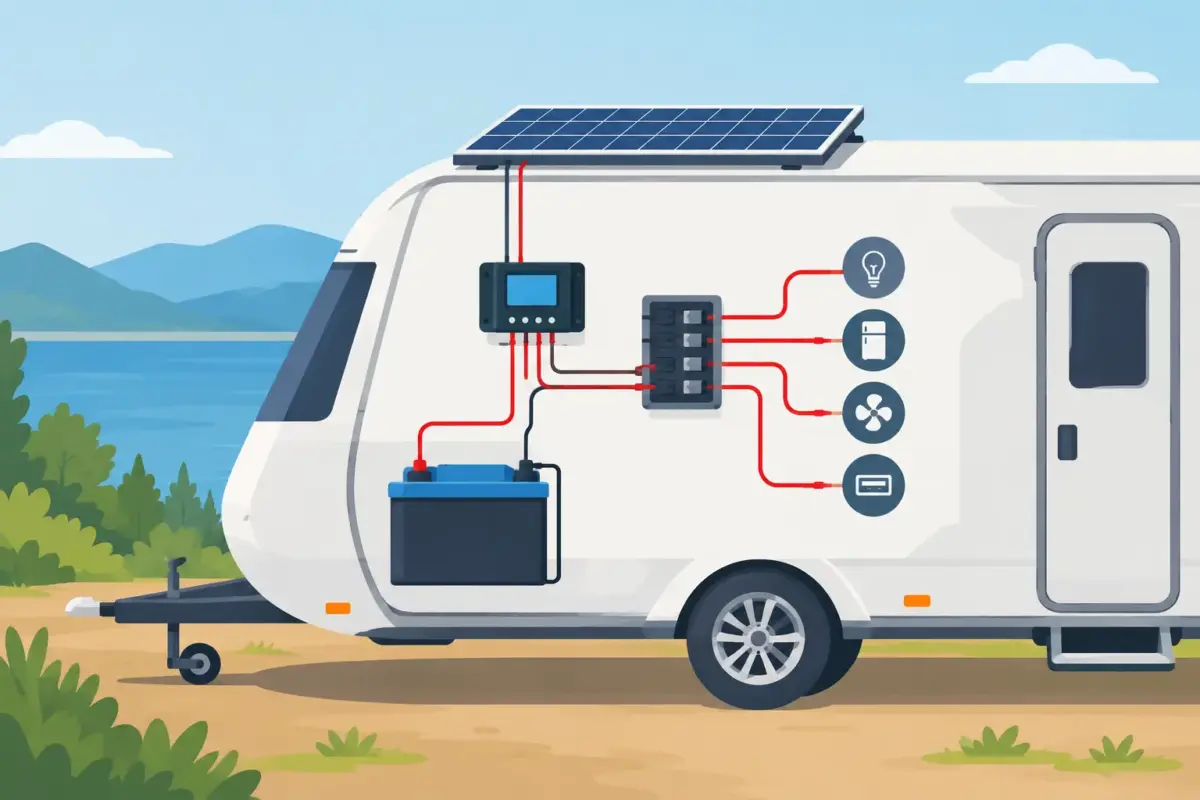
A caravan solar wiring layout example is most useful when it shows the complete power path, not just a panel connected to a battery. The reliable path is solar panel to protection and isolation, then to the solar regulator, battery bank, fused distribution and finally your 12V loads. Get that order right and fault-finding, upgrades and safe touring power all become much simpler.
For a typical Australian caravan, the solar system has to cope with corrugations, heat, dust, long cable runs and periods away from mains power. That makes cable size, termination quality, fusing and component placement just as important as the wattage printed on the solar panel.
A practical caravan solar wiring layout example
This layout suits a single 12V battery bank with roof-mounted solar, an MPPT regulator and common caravan loads such as lights, water pump, compressor fridge controls, USB outlets and a diesel heater.
“`text SOLAR PANEL/S | | UV-rated twin solar cable v PV ISOLATOR OR DC CIRCUIT BREAKER | v MPPT SOLAR REGULATOR | | Positive cable protected by a fuse close to battery v BATTERY POSITIVE —- MAIN FUSE —- POSITIVE FUSE BOX/BUS | | | +— Lights | +— Water pump | +— Fridge control circuit | +— USB/12V sockets | +— Other fused 12V loads | BATTERY NEGATIVE —- BATTERY MONITOR SHUNT —- NEGATIVE BUS | +— All load negatives +— Solar regulator negative “`
The main rule is straightforward: every positive cable leaving a battery needs suitable overcurrent protection sized for the cable and the expected load. Place that protection as close as practical to the battery positive terminal. A fuse protects the cable from a short circuit. It does not protect a device from being used beyond its rating.
The negative side deserves the same attention. If you run a battery monitor, the shunt must sit between the battery negative terminal and the common negative bus. Solar, DC-DC charging, 12V loads and inverter negatives need to connect on the load side of the shunt. If a load is connected directly to battery negative, the monitor will not see its current draw or charge input, and its state-of-charge readings will be wrong.
Start with the battery bank and loads
Work backwards from how the caravan is actually used. A couple travelling with a compressor fridge, water pump, lighting and mobile charging has a different demand profile to a family running an inverter, coffee machine, induction cooktop or satellite system.
Battery capacity is measured in amp-hours, but usable energy is better considered in watt-hours. A 12V 200Ah lithium battery has roughly 2,400Wh of nominal stored energy, although usable capacity and charging limits depend on the battery’s battery management system. Lead-acid batteries should generally not be routinely discharged as deeply as lithium batteries.
List the loads, their current draw and how long they run each day. This exposes the loads that matter. LED lights consume very little. A water pump runs intermittently. A compressor fridge, diesel heater fan and inverter can make a far bigger difference to daily consumption. Solar needs to replace normal daily use with enough margin for cloud, shade and less-than-perfect panel angle.
Keep high-current equipment on dedicated circuits. An inverter should not be fed through the general caravan fuse box. It needs appropriately sized positive and negative cables, its own correctly rated fuse or circuit breaker close to the battery, and cable runs kept as short as possible. Inverters can draw substantial current even at modest 240V loads.
Choose panel configuration before sizing cable
A single 200W or 250W panel is simple, but it may not keep up with a large fridge load in poor weather. Two or more panels create more flexibility, but how they are connected changes the wiring requirements.
Panels wired in parallel keep the solar voltage similar to one panel while increasing current. This can be useful where partial shade affects only one panel, but higher current may require heavier cable and proper combining protection. Panels wired in series increase voltage while current remains similar to one panel. This usually reduces voltage drop over a long roof run and works well with an MPPT regulator rated for the combined open-circuit voltage.
Series wiring is not automatically better. Shade across one panel can limit output from the whole string, and the regulator’s maximum PV input voltage must never be exceeded. Check the panel Voc figure, apply the manufacturer’s temperature allowance, and select a regulator with adequate headroom. Do not assume a regulator that suits one panel will safely accept two panels in series.
Portable panels can be a worthwhile addition when the caravan is parked under trees but there is sun nearby. They still need a protected connection, correct polarity and a regulator arrangement that matches the system design. Avoid plugging an unregulated panel directly into a battery unless it is specifically designed and controlled for that purpose.
Regulator placement and cable sizing matter
An MPPT regulator is normally the right choice for roof-mounted caravan solar, particularly where panel voltage is higher than battery voltage or cable runs are longer. Put the regulator as close to the battery bank as practical, in a dry, ventilated location. The cable between regulator and battery carries charging current at battery voltage, so voltage drop here directly affects charging performance.
As a broad starting point, 4mm² or 6mm² UV-rated solar cable may suit many panel-to-regulator runs, while regulator-to-battery cable is often larger. The correct size depends on maximum current, cable length, installation method and acceptable voltage drop. A 30A or 40A regulator on a long run may need 10mm² or 16mm² cable rather than lighter twin cable.
Do not rely on the outside diameter or a marketing label alone. Confirm the actual conductor cross-section, insulation temperature rating and suitability for automotive or solar use. For caravan work, use quality crimp terminals, proper ratchet crimping tools, adhesive-lined heatshrink where appropriate, and cable protection anywhere wiring passes through a roof, wall, chassis member or sharp-edged cabinet opening.
MC4-style solar connectors need to be compatible, correctly crimped and fully engaged. Mixing lookalike connectors from different manufacturers can create a poor connection point. A high-resistance solar connection may work on the driveway, then cause intermittent charging once vibration and heat take hold.
Fusing, isolation and safe routing
A solar panel can produce power whenever it is in sunlight, so fit a means of isolation between the panel array and the regulator. A DC-rated PV isolator or circuit breaker makes servicing safer and gives you a clear way to disconnect solar input. Use equipment rated for DC at the actual system voltage. AC circuit breakers are not a substitute for correctly rated DC protection.
The regulator’s battery positive cable also requires a fuse close to the battery. Size it to protect the cable and allow the regulator’s maximum output. Follow the regulator manufacturer’s requirements, especially if it specifies fuse ratings, earthing arrangements or connection order. Many regulators should be connected to the battery before solar input so they can identify the system voltage correctly.
Route cables away from exhaust heat, moving suspension parts, gas lines and locations where stored gear can crush them. Support wiring at regular intervals and use split conduit, corrugated tubing or heavier mechanical protection where needed. Leave enough service loop to remove a regulator or battery, but do not leave loose cable that can rub through on rough roads.
If the caravan has a chassis earth system, follow the equipment manufacturer’s instructions for bonding. Do not use the chassis as the negative return for high-current circuits unless the installation has been designed for it. Purpose-run negative cable and a properly sized negative bus are more predictable and easier to inspect.
Allow for charging beyond solar
Most touring caravans charge from more than one source: solar when parked, a DC-DC charger while towing and a 240V charger when connected to mains power. All sources can charge the same battery bank, but each needs its own correctly protected wiring and must suit the battery chemistry.
A DC-DC charger should have dedicated input protection at the vehicle end and caravan end, suitable cable for the run, and an Anderson-style connector rated for the current. The solar regulator, DC-DC charger and mains charger should all use charging profiles approved by the battery manufacturer. Lithium systems especially need charging voltages, low-temperature limits and alternator protection considered as a package.
Plan the layout with spare ways on the fuse box and room around the busbars. Adding a second battery, portable solar input, battery monitor or extra lighting later is far easier when the original wiring is labelled and accessible. Bluebar Industries stocks the practical cable, connectors, protective accessories and 12V components needed to build or repair these systems properly.
Before energising the system, check polarity with a multimeter, confirm every fuse rating, tighten terminals to the manufacturer’s specification and inspect all cable runs. If the job involves 240V integration, major battery banks or you are unsure about cable and protection calculations, use a qualified auto electrician. A clean, labelled solar installation pays off every time you stop somewhere remote, put the kettle on and know the battery will still be there by morning.











